
The Claro Mapping Challenge
As we are now restricted in what we can do, how about having a go at drawing your own orienteering map?
The challenge – create a map of a 1kmx1km area that contains your own property – or somewhere else of your choosing.
How do you go about it! All the material referred to is available for free.
Section 1: – How to create a map in Open Orienteering Mapper.
Resources:
The mapping software https://www.openorienteering.org/apps/mapper/
The Georeferenced OS Streetmap tiles:
SE25SE.tif , SE25NE.tif, SE35NE.tif , SE35NW.tif , SE35SW.tif
Section 2: – How have you got on? With such a small and probably urban test area, did you create a 1:4000 map?
If not I suggest you do it again at 1:4000 – it’s good practise, make sure you use the 1:4000 symbol set.
Now you will be ready to start drawing.
Before drawing anything you need on the map, have a general practise drawing shapes.
Rather than me tell you how in detail, it is best that you read the instructions! I know that doesn’t normally appeal, but it is worth doing – even those of you have have used OCAD8/9 before there are some subtle differences (improvements in my view).
The best help page is here: https://www.openorienteering.org/mapper-manual/pages/toolbars.html#drawing-toolbar
The section headed “Draw Paths” – 30% of the way down the page is an absolute must – especially how you can draw straight and curved lines with the same tool.
Do not draw curved lines as a series of short straights – it looks bad and it increases the file size – a few curve points are best.
Note also the enter key to “close” a path back to the start point.
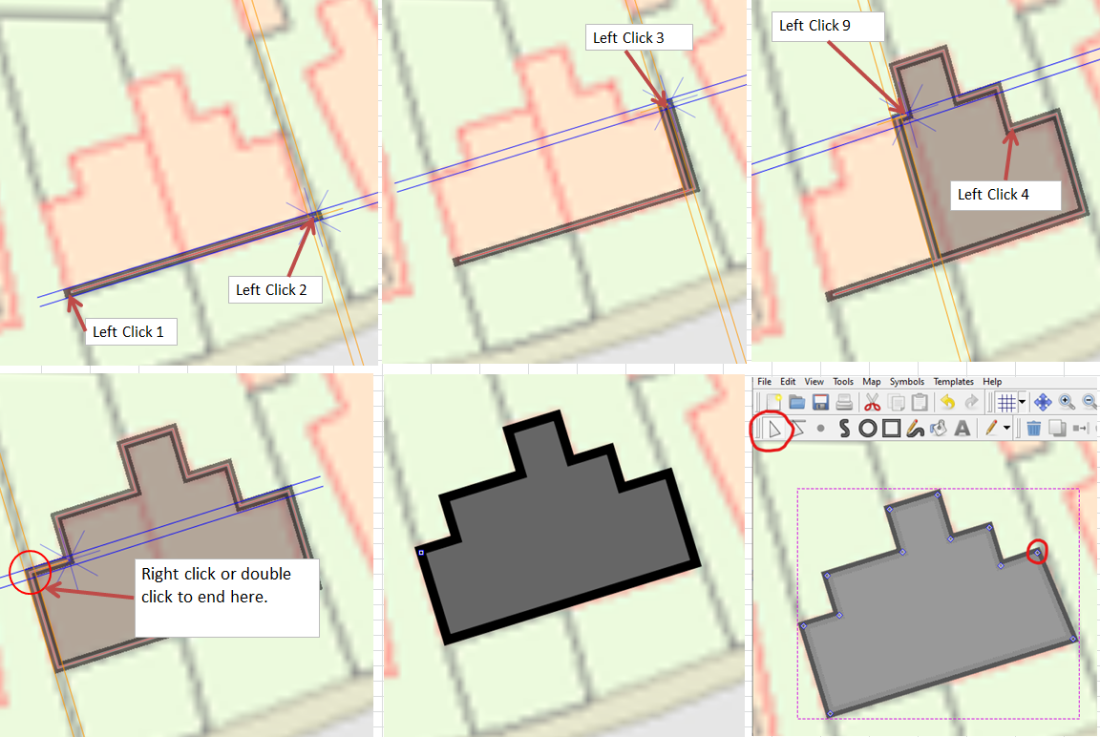
For drawing buildings which normally have a lot of 90° corners, have a practise with this on a building with several projections / indents doing it all in one go.
Click on the building with the grey centre (symbol 521.0), then the square “rectangle” tool on the toolbar;
Start with a click on one corner of a long side, click 2 at the other end of this side. Then continue round the shape as shown below; on the last corner don’t left-click, either right click or double left click to complete the shape – you don’t have to end on the start point – this just creates a spurious extra point.
If you want to fine adjust anything now it is all drawn at right angles, click on the triangular toolbar “edit objects” symbol, you can now grab any of the corner points with the mouse and move them.
Off you go then…..
A question has arisen about roads on an urban map.
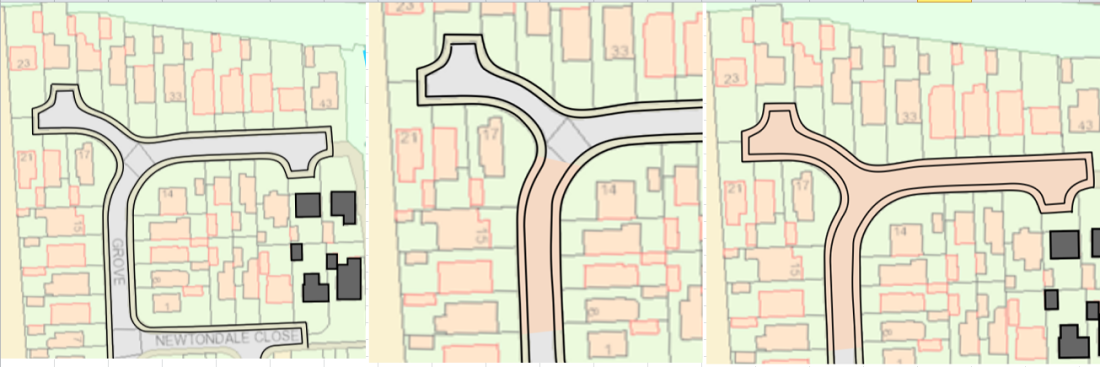
You can’t use the road symbol, you have to draw the road / pavement edges then fill it in with paved area.
Draw the paved area edges with symbol 501.100 (step or edge of paved area) using the line function, and then the pavement edge (Pavement 1 below).
The slick bit: Select the paved area infill (501.1), you can then fill in to the line you have drawn.
Hold the shift key down (and keep it held down) click the outer paved area boundary (with the line tool selected) close to your start point, release the left mouse button (not the shift key) then click again with the left mouse button on the line – swing the mouse round to the far side of the paved area boundary release the mouse button when it is filled to your requirement, then release the shift key, and finally press enter to complete drawing the area.
The fill in the 3rd image across took less than 10 seconds to do – try it a few times (use the undo button), and you will get the knack.
You can draw an enclosed paved area using 501.0 paved area with boundary, but not as useful on a big area of roads/paving.
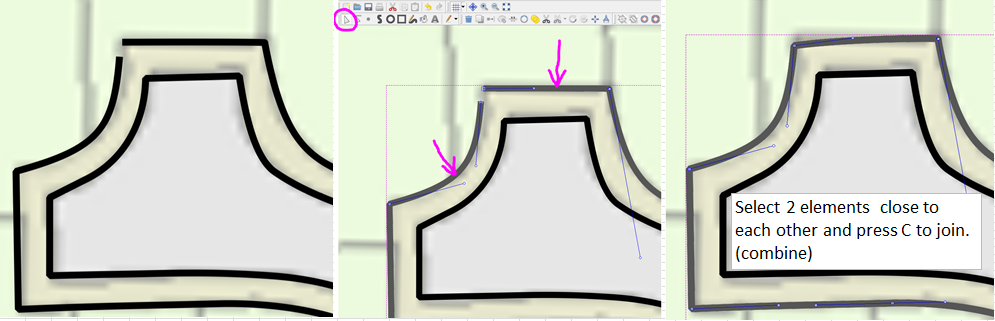
Ah…. your fill didn’t work? The boundary line you are using for the auto-fill has to be one continuous line.
If it is drawn in a series of lines next to each other, you have to join them – how?
Using the triangular select tool, click on the line to see where it stops.
Hold the shift key down and click on the line next to it so both elements are selected (middle image below), then press C and they will be joined.
If you need to, adjust the joined point to the correct position. You should be able to fill the area OK when completed.
Note, joining areas has it’s own tool, on the toolbar near the scissors.
Any more questions, just let me know.